Adding Style with CSS
Today we will talk about how to add ✨ style ✨ to your web sites. By the end of the class you will know how to:
- Change the colour and font of text
- Change the background colour
- Recognize the different sections of your web site
🔖 Using This Page
Before that let’s review what we did yesterday! Also, let’s learn some new HTML that you didn’t get to practice in your first class. Then we’ll go on to CSS!
Review: Parts of a web page and styling text
Open your code playground. You should be able to see your code from last session, if not, you can use this:
<!DOCTYPE html>
<html>
<head>
  <meta charset="utf-8">
  <title>Favourite foods</title>
  <link href="/offline/unpkg.com/chota.css" rel="stylesheet" type="text/css" />

</head>
<body>

  <h1>My favourite foods</h1>
  <p>I like to eat...</p>

  <p>During the holidays these are my favourite dishes:</p>

  <ul>
  <li>First Holiday
    <ul>
      <li>Dish 1</li>
      <li>Dish 2</li>
    </ul>
  </li>
  <li>Second Holiday
    <ul>
      <li>Dish 1</li>
      <li>Dish 2</li>
    </ul>
  </li>
  <li>Third Holiday</li>
  </ul>

  <h1>Ranked list of my favourite foods</h1>
  <ol>
    <li>Dish name</li>
    <li>Dish name</li>
    <li>Dish name</li>
    <li>Dish name</li>
  </ol>

</body>
</html>
Your turn:
- Can you highlight your least favourite dish on the list?
- Can you make all the Holiday names italic?
- Can you highlight your least favourite dish on the list?
Activity: Practicing Tags 💻
Open style file and copy its content into the CSS section of your code playground. CSS stands for Cascading Style Sheets and is a way to change how the colour and text on your web page, as well as everything else, looks. We’ll learn more about this in a little bit!
For now, copy the code below in the HTML section of your code playground
<!DOCTYPE html>
<html>
  <head>
    <meta charset="utf-8" />
    <link href="style.css" rel="stylesheet"/>
    <title></title>
  </head>
  <body>
    <main>
      <header>

      </header>

      <nav>
      </nav>

      <section class="sidebar">
      </section>

      <article>
        <p>
        </p>
      </article>

      <aside>

      </aside>
    </main>
  </body>
</html>
Write a short paragraph with a headline about your favourite foods and your school in
<article>. Make sure that what you write is in the<p>and<h2>tags.Think of a title and put it in
<h1>and write a title for your document in<header>element.You can draw attention to text in a couple ways:
<strong>important</strong>to show text is important
<em>emphasize</em>to emphasize text similar to how you speak
Style and HTML
You have already changed a lot in terms of the style of your page.
However, the way we have been doing these modifications seems to be highly inefficient. Imagine if you have lots of Heading 2s and you want to change their color all to red. Certainly it does not seem easy to go around and add lots and lots of tags to change the color of each Heading to red.
Happily you can! With an external stylesheet we can give instructions to a computer on how we want the page to look.
You have already been using CSS (Cascading Style Sheets).
Let’s now learn about it with an activity.
Activity: Adding CSS 💻
Open your code from the last session. You had written a title for your page under the
<header>tag with use of<h1>tag.Now add the starter code here to the CSS section of your code playground. Remember not to change the rest of the CSS code.
h1 {
font-weight: normal;
color: white;
font-size: 40px;
font-family: Courier;
background-color: green;
text-align: center;
}
What happened? Try some variations to better understand how the CSS is changing the way the content of the HTML is represented.
Try to change the appearance of your
<p>elements: try changing the color, the background, and alignment.
Introduction to CSS
In the last activity you made your first CSS modifications. CSS is a programming language which is used to change the way a HTML document is represented in a web browser.
A good way to think about this is to imagine the HTML document as the skeleton of a web page, and the CSS document as the appearance of the body. HTML is the structural layer and CSS is the presentation layer.
As it is illustrated above, CSS can turn your HTML into a wonderful and pretty web page ✨.
In the last activity you used h1{} to change some stuff with the way the <h1> is presented in the HTML documented.
To understand CSS you need to understand what are selectors and properties
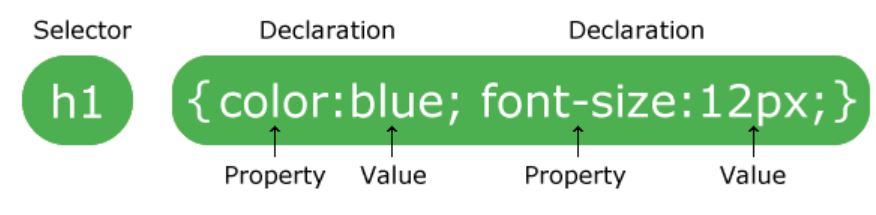
We can change HTML tag properties through defining selectors in the CSS code and modifying some of the properties of the tag in that selector.
Remember how computers need very specific instructions? With CSS the curly brackers {,}, and semicolons ; are and important part.
We introduce you to 4 ways you can take advantage of CSS powers:
You have already used the simple case use through the last activity. You can define a selector for a certain tag and change some of the properties.
You can instruct your machine to change some of the properties of a tag, only when the tag is used within a certain tag. Use this code below in your CSS:
section > h2 {
font-weight:bold;
color: white;
font-size: 30px;
font-family: Courier;
background-color: Red;
text-align: center;
}
Now add a
<h2>element to your<section>element. See the difference?<h2>does not behave the same in<section>and<article>.You can define a new
idand use it in your HTML code. Add this snippet to your CSS.#box1 { grid-area: f; background-color: Green; text-align: center; }Remember we put our nested list from the last activity into a
<div>element?Now change this line:
<div>To this:
<div id="box1"><section>Box1</section>
Did you see what happened?
You told the computer to interpret this <div> element as a box1 and it did so for you! Now try to make some more variations.
- You can also define classes of things. Use this code below in your CSS:
css
p.extrabig {
  font-weight:bold;
  font-size: 25px;
}
Now add a<p class="extrabig>element to your<article>element and write something. As you can see, you have changed some properties of the<p>element by defining a newclassand redefining some the properties in there.
Activity: Add stuff to the sidebar 💻
By now you know a lot about CSS! Try to read the CSS code we have given you. Discuss the code with your partners and fill free to ask about different parts of it from your instructor.
Your instructor should have some images ready for you. Get the links from your instructor and add the images to your
<section>element. Take notice of how this element is of classsidebar.We have created a number of boxes for you. Start add stuff to this boxes in your
<article>element. Try to change some of the properties in different boxes. Maybe change the background in some of them, or change the color.